SUPSIS JS SDK
Integration
To add the Supsis Chat Balloon to your site, you must add the code below to the top of each page of your site. is required.
* SUPSIS SDK is loaded asynchronously and does not affect site loading speed.
* You can only add it to the pages you want to have chat bubbles on.
* Once Supsis SDK is installed and the app is ready, a balloon will appear!!
Integration Code
<script>window.supsis=window.supsis||function(){(supsis.q = supsis.q || []).push(arguments)};supsis.l=+new
    Date;</script>
<script src="https://SITE_DOMAIN_ADINIZ.visitor.supsis.live/static/js/loader.js" type="text/javascript" async
        defer></script>
** If you come from IdeaSoft, your ideasoft domain name will be your supsis domain name.
For example, if you are logging in via market71.supsis.live, YOUR SITE_DOMAIN_NAME=market71**
SYNC API
For use of SYNC API supsis.. ASYNC API is for using supsis() API methods will be shown under ASYNC.
| METHOD | Usage with SYNC API | Usage with ASYNC API |
|---|---|---|
| Opening the Chat Screen | supsis("open") |
supsis.open() |
| Hiding the Chat Bubble | supsis("minimize") |
supsis.minimize() |
| end conversation | supsis("closechat") |
supsis.closeChat() |
| Defining User Data | supsis("setUserData",{name:'Ali',email:'a@a.com'}) |
supsis.setUserData({name:'Ali',email:'a@a.com'}) |
| User Contact Properties | supsis("setContactProperty",{badget:'gold-member'}) |
supsis.setContactProperty({badget:'gold-member'}) |
| Set Vip Visitor | supsis("setVipVisitor", false) |
supsis.setVipVisitor(true) |
supsis("ready", (supsis) => {
    //suspis'i bu alanda sync olarak kullanabilirsiniz

    supsis.open();
    supsis.setUserData({ name: "Ali", email: "a@a.com" });
});
Or you can install the SDK as sync and run your code after this line.
!! Installing sync may add a small overhead to your site loading speed.
<script src="https://SITE_DOMAIN_ADINIZ.visitor.supsis.live/static/js/loader.js" type="text/javascript">
    supsis.open()
    supsis.setUserData({name:'Ali',email:'a@a.com'})

</script>
ASYNC API
Since Supsis SDK is loaded async, your API call codes will work after it is loaded. ASYNC API structure is as follows.
supsis(API_FUNCTION_NAME, payload);
- "API_FUNCTION_NAME" string değerdir. çalıştırılacak fonksiyon ismini alır.
- supsis.open() karşılığı ===> supsis("open")
- payload çağırdığınız fonksiyon parametre alıyorsa buradan girebilirsiniz
Changing Visitor to Vip
supsis("setVipVisitor", false); // false = not vip, true = vip
Hiding Chat Bubble
supsis("minimize");
Opening the Chat Screen
supsis("open");
Ending Conversation
supsis("closeChat");
Changing Department
supsis("department", "$DEPARTMENT_TITLE");
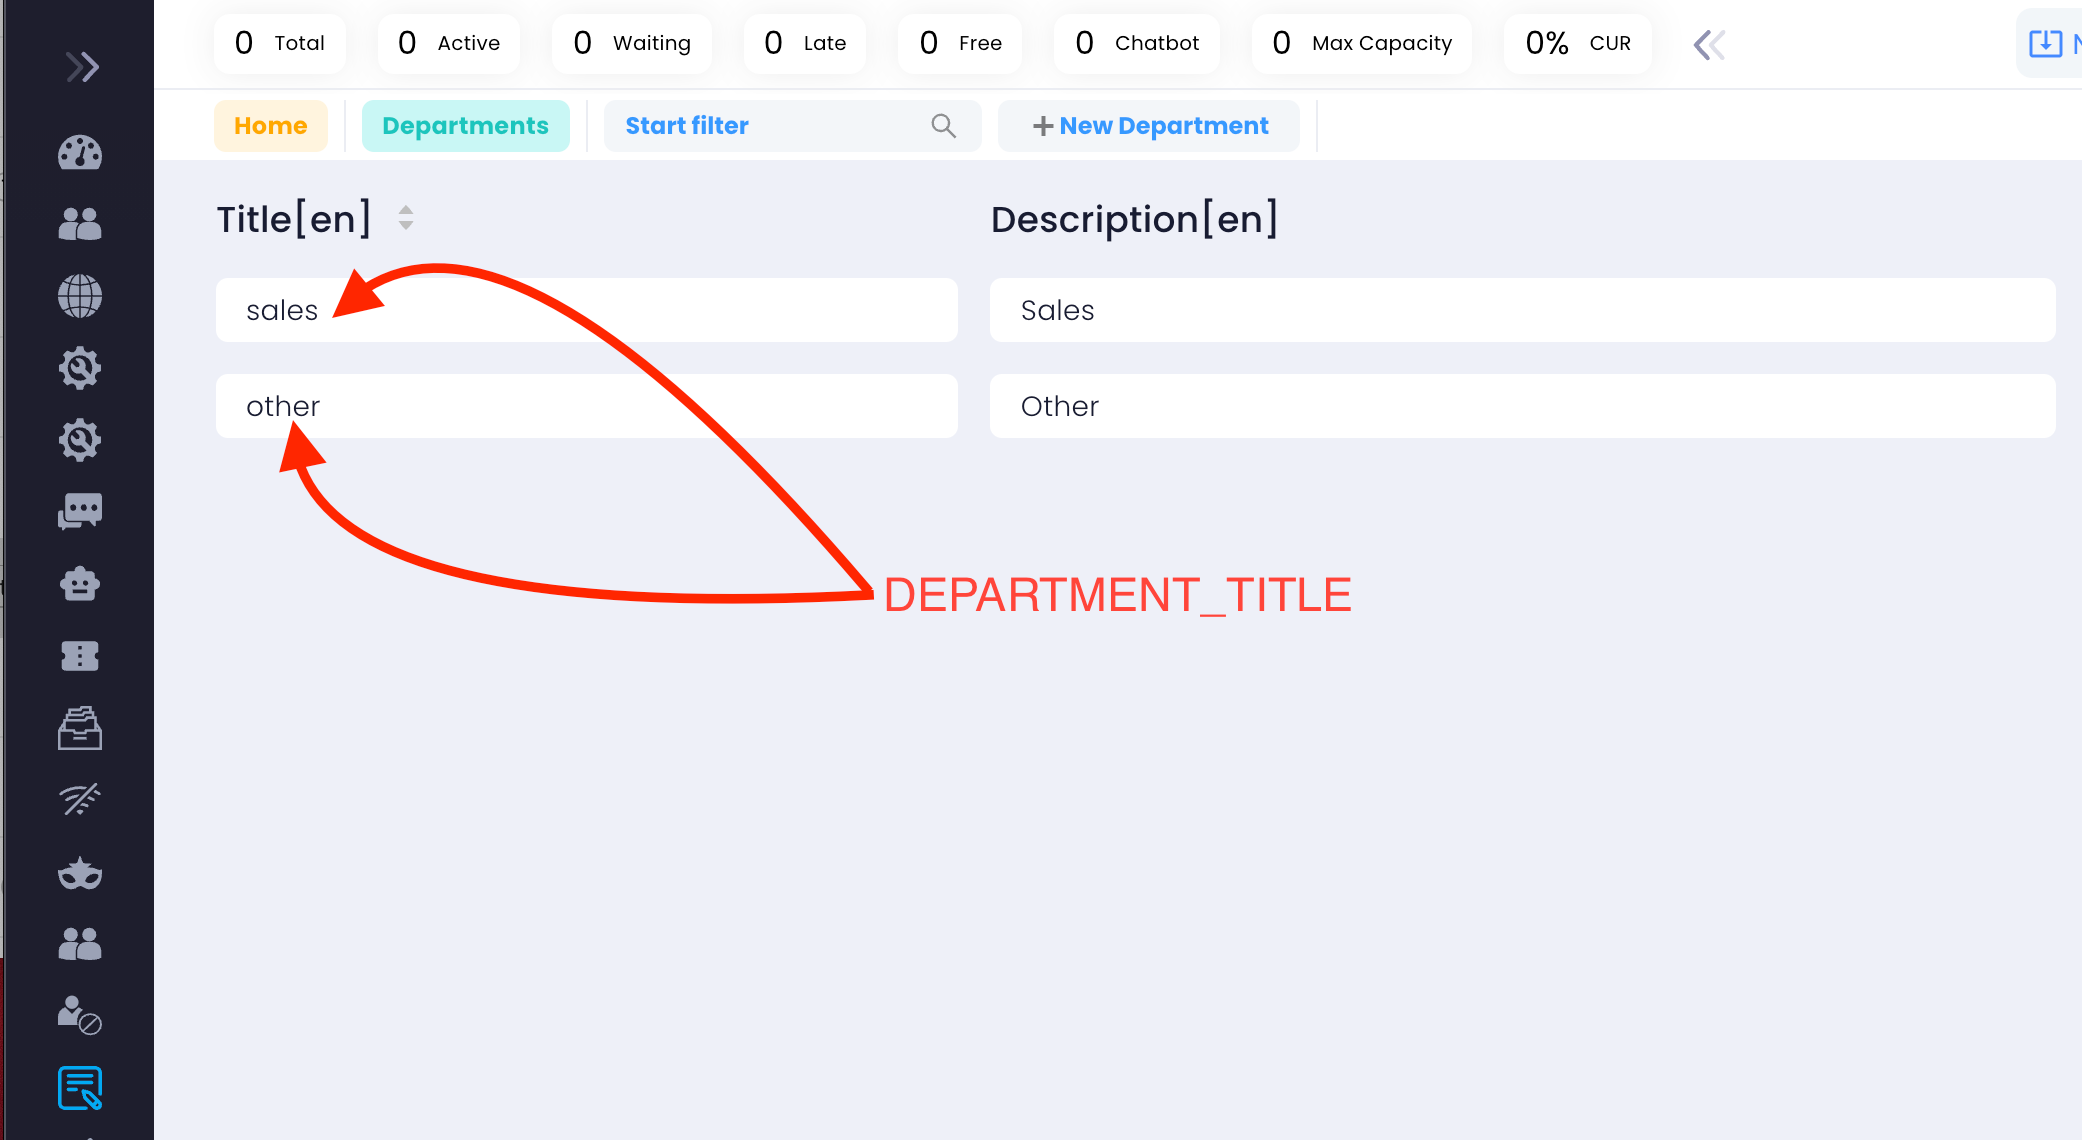
- department title values must be the same for all languages
Changing Visitor Information
If you provide your visitors' personal information to Supsis SDK before they click on the chat bubble and get support. automatic information is set. Chat via supsis support with your name, surname and email information in your system. can start.
Not: If user data is not provided, the chat is started with the information received from the Supsis Login Form.
Changing Visitor Information for the Default Login Form
supsis("setUserData", {
    name: "Sitenize Login Olan Kullanıcın Adı ve Soyadı",
    email: "Sitenize Login Olan Kullanıcın Eppst Adresi",
});
Changing Visitor Information for a Customized Login Form
- Mandatory fields (name, email) in Special Login Forms
- You can expand other fields as you wish. You need to give a name to each field. These field names will be used by visitors to change information remotely.
Let's design a sample Custom Login Form and add the following fields (name, email, phone, identityNumber)
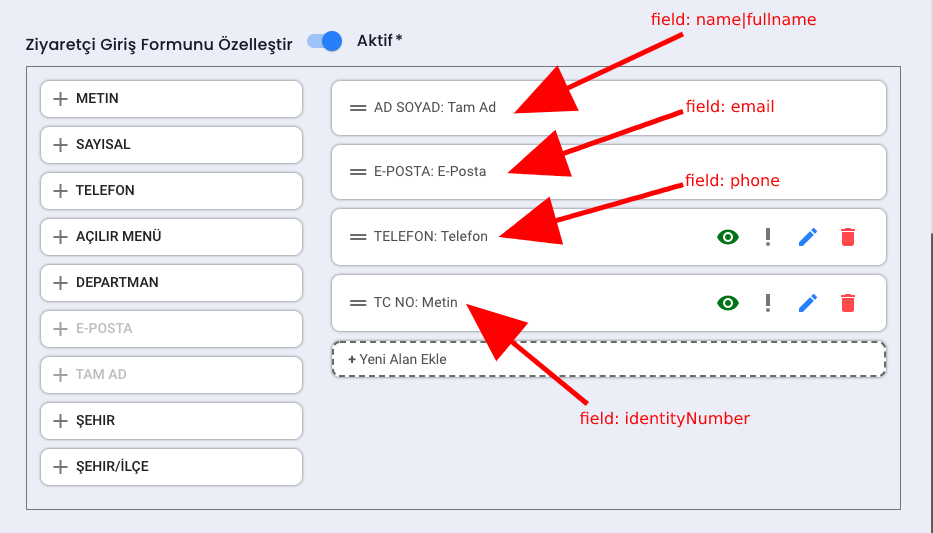

supsis("setUserData", {
    name: "John Doe",
    email: "jonh.doe@gmail.com",
    phone: "5396829048",
    identityNumber: "13451123445",
});
When you run the above command, the login form will appear filled out.

Changing Customized User Data (User Contact Properties)
- You can change the Customized User Data you created through the panel
- For example, one of your customers connected to live support and you want to get more detailed information about him. This feature may be useful to you.
Sample Steps
- If you want to know your customer's membership level, you can look at the step below.
Now we create a label called User Rank and update the future value, that is, the name, as Field, in accordance with the appropriate conditions.
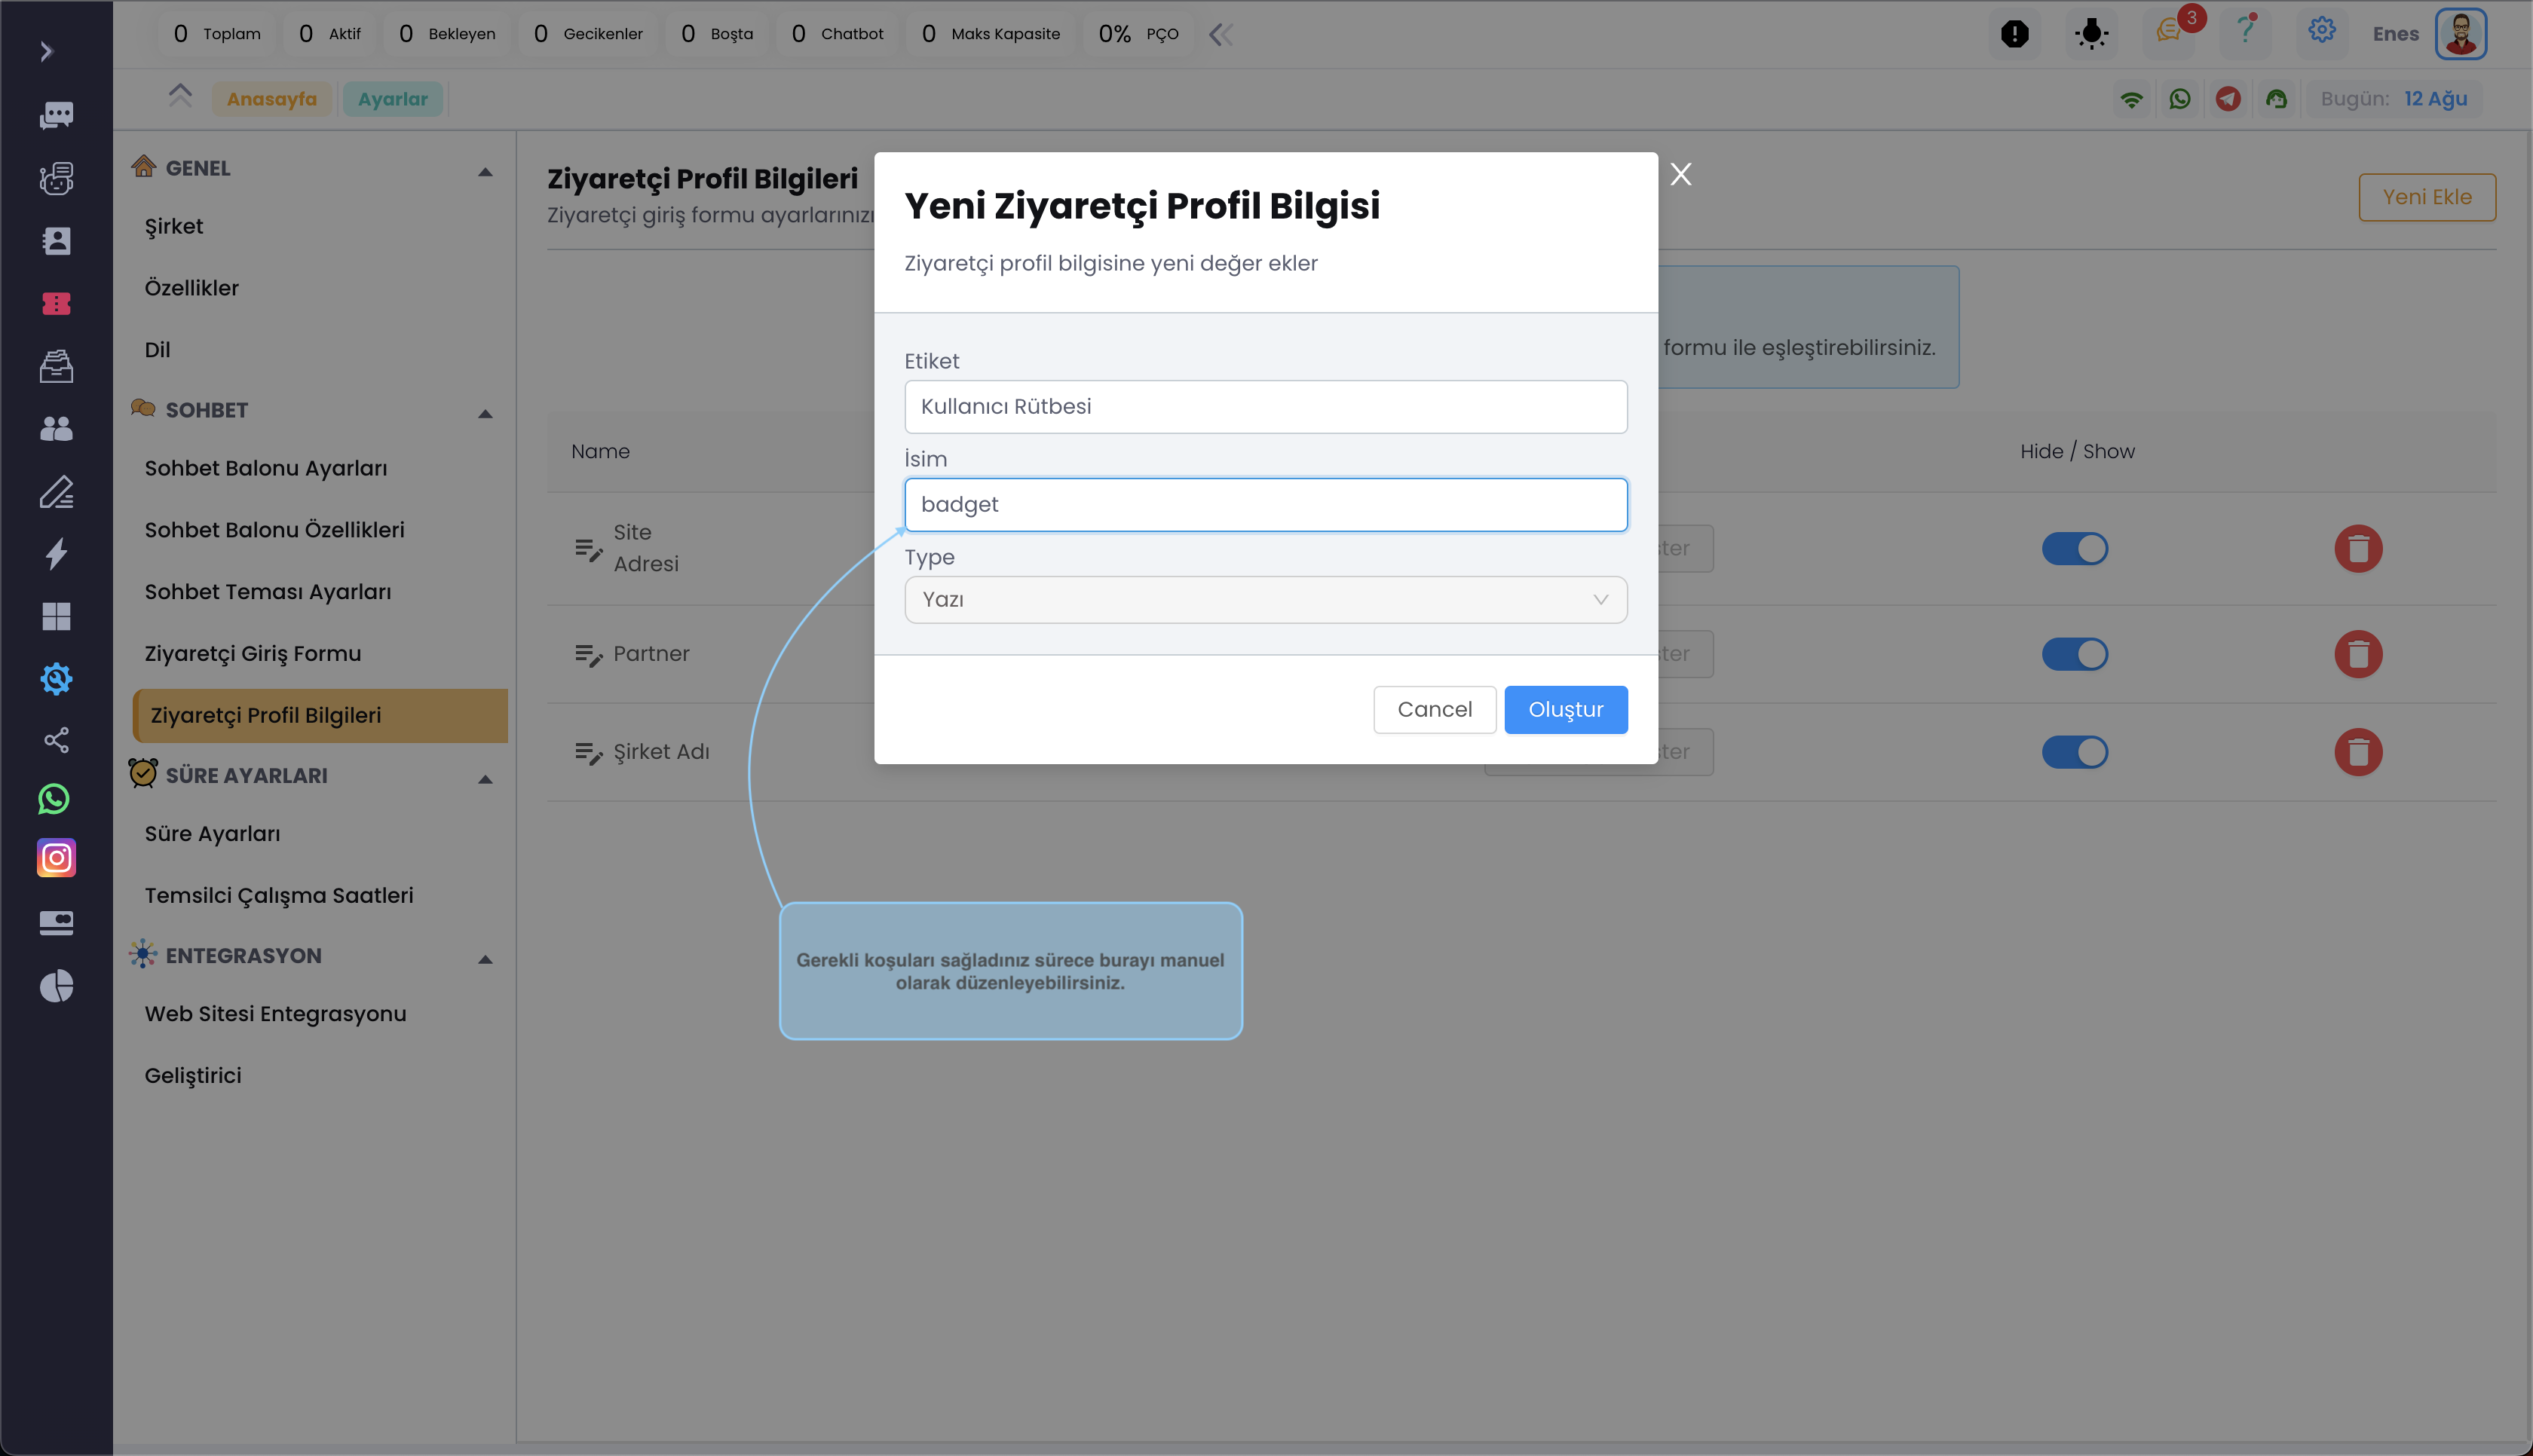
- We want to add the label we created called User Rank to your customer.

supsis("ready", (supsis) => {
    // Supsis hazır olduğunda gelen eventi dinliyoruz.
    // member datası sizin websitesindeki datasını alıyorsunuz.
    const member = {
        badget: "gold_member",
        ...
    };
    supsis.setContactProperty({  badget: member.badget });
});