Entegrasyon
Web sitenize Supsis Sohbet Aracını (Widget) eklemek için, aşağıdaki kodu sitenizdeki her sayfanın en üstüne (head alanına) eklemeniz gerekmektedir.
- SUPSIS SDK asenkron olarak yüklenir ve sayfa yüklenme hızını etkilemez.
- Yalnızca sohbet aracının görünmesini istediğiniz sayfalara ekleyebilirsiniz.
- Supsis SDK yüklendikten ve uygulama hazır olduktan sonra widget görüntülenecektir!!
Entegrasyon Kodu
<script>
  window.supsis = window.supsis || function () {
    (supsis.q = supsis.q || []).push(arguments);
  };
  supsis.l = +new Date;
</script>

<script
  src="https://SITE_DOMAIN_NAME.visitor.supsis.live/static/js/loader.js"
  type="text/javascript"
  async
  defer>
</script>
SITE_DOMAIN_NAME kısmı, Supsis'e kayıt olurken belirttiğiniz alan adı (domain name) ile değiştirilmelidir.
Eğer IdeaSoft altyapısından geldiyseniz, IdeaSoft alan adınız Supsis alan adınız olacaktır.
Örneğin, market71.supsis.live üzerinden giriş yapıyorsanız, SITE_DOMAIN_NAME=market71 olacaktır.
SYNC API (Senkron API)
SYNC API supsis. sözdizimi ile kullanılır. ASYNC API ise supsis() sözdizimi ile kullanılır.
API metodları ASYNC altında gösterilecektir.
| METOD | SYNC API Kullanımı | ASYNC API Kullanımı |
|---|---|---|
| Sohbet Ekranını Aç | supsis("open") |
supsis.open() |
| Sohbet Balonunu Küçült | supsis("minimize") |
supsis.minimize() |
| Sohbet Balonunu Gizle | supsis("hide") |
supsis.hide() |
| Görüşmeyi Sonlandır | supsis("closechat") |
supsis.closeChat() |
| Kullanıcı Verilerini Ayarla | supsis("setUserData",{name:'Ali',email:'a@a.com'}) |
supsis.setUserData({name:'Ali',email:'a@a.com'}) |
| Kullanıcı İletişim Özellikleri | supsis("setContactProperty",{badget:'gold-member'}) |
supsis.setContactProperty({badget:'gold-member'}) |
| Ziyaretçiyi VIP Yap | supsis("setVisitorVip", false) |
supsis.setVisitorVip(false) |
supsis("ready", (supsis) => {
    // supsis'i bu kapsam içinde senkron olarak kullanabilirsiniz

    supsis.open();
    supsis.setUserData({ name: "Ali", email: "a@a.com" });
});
Veya SDK'yı senkron olarak yükleyebilir ve kodunuzu bu satırdan sonra çalıştırabilirsiniz.
Not: Senkron yükleme, sitenizin yüklenme hızına küçük bir ek yük getirebilir.
<script src="https://SITE_DOMAIN_ADINIZ.visitor.supsis.live/static/js/loader.js" type="text/javascript">
    supsis.open()
    supsis.setUserData({name:'Ali',email:'a@a.com'})
</script>
ASYNC API (Asenkron API)
Supsis SDK asenkron olarak yüklendiğinden, API çağrılarınız SDK yüklendikten sonra çalışacaktır.
ASYNC API yapısı şu şekildedir:
"API_FUNCTION_NAME"bir string'tir ve çalıştırılacak fonksiyon adını temsil eder.- Eşdeğeri:
supsis.open()===>supsis("open")
- Eşdeğeri:
payload, çağırdığınız fonksiyon parametre gerektiriyorsa kullanılır.
Müşteriyi VIP Yap
Sohbet Balonunu Küçült
Sohbet Balonunu Gizle
Sohbet Ekranını Aç
Görüşmeyi Sonlandır
Departman Değiştir
- Departman başlık değerleri tüm dillerde aynı olmalıdır.
Ziyaretçi Bilgilerini Güncelle
Ziyaretçilerinizin kişisel bilgilerini, onlar sohbet balonuna tıklayıp destek istemeden önce Supsis SDK'ya iletirseniz, bilgileri otomatik olarak ayarlanacaktır. Sisteminizdeki isim ve e-posta adresini kullanarak doğrudan sohbete başlayabilirler.
Not: Eğer kullanıcı verisi sağlanmazsa, sohbet Supsis Giriş Formu (Login Form) üzerinden toplanan bilgilerle başlar.
Varsayılan Giriş Formu İçin Ziyaretçi Bilgilerini Güncelleme
supsis("setUserData", {
    name: "Giriş yapan kullanıcının adı ve soyadı",
    email: "Giriş yapan kullanıcının e-posta adresi",
});
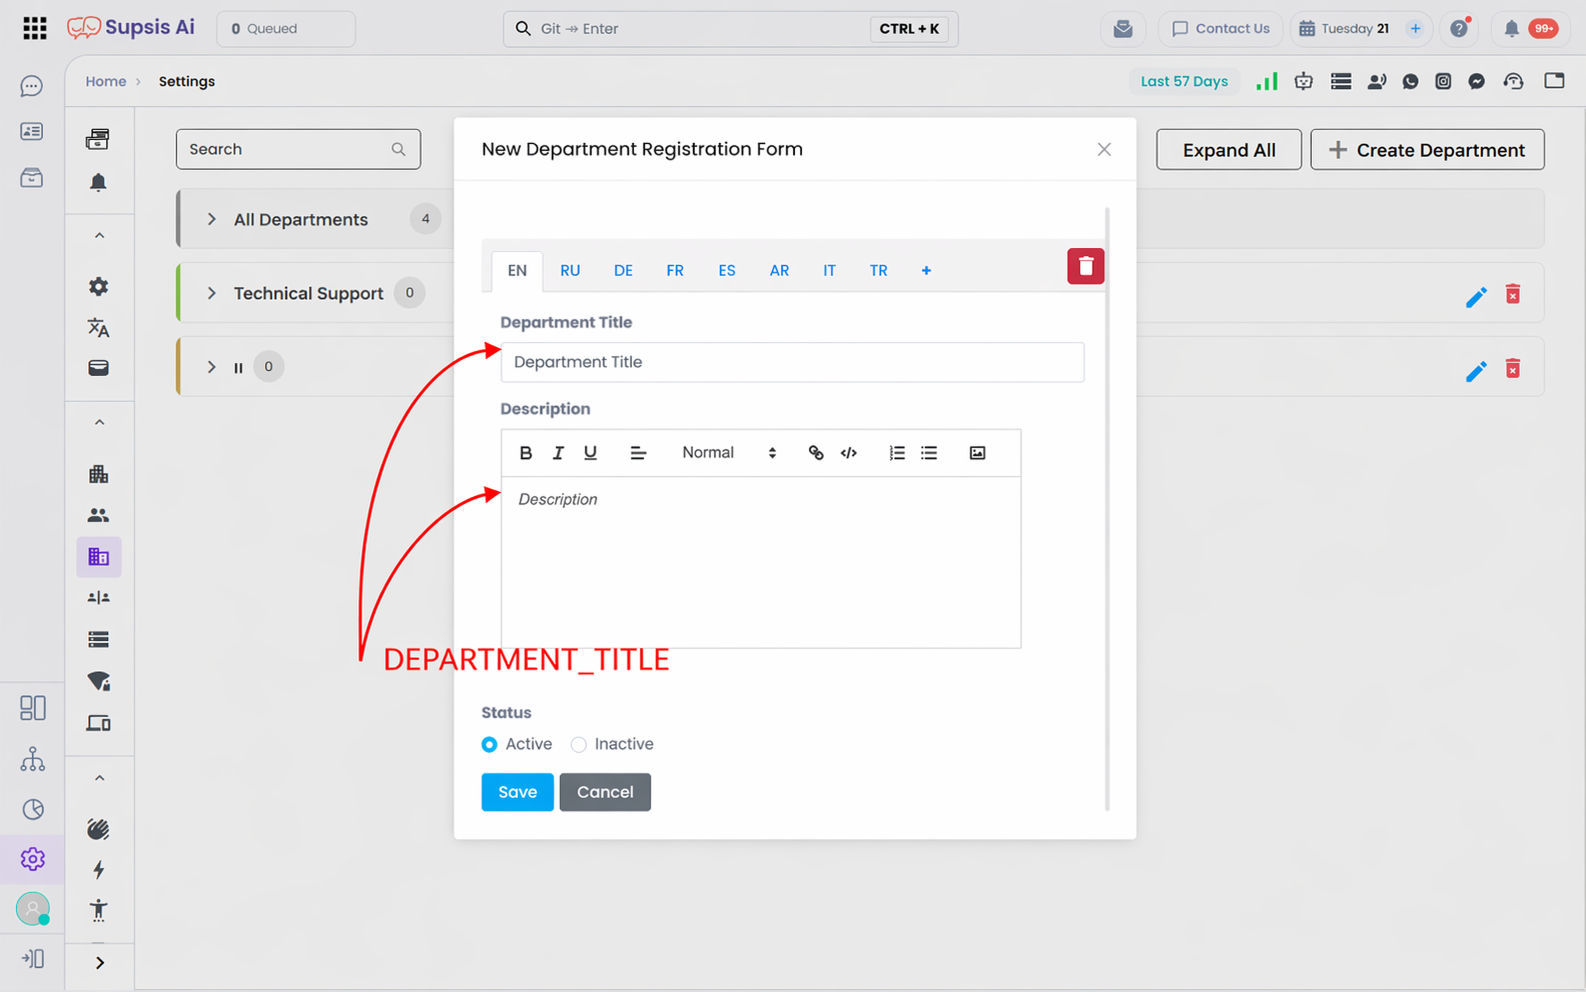
Özel Giriş Formu İçin Ziyaretçi Bilgilerini Güncelleme
- Özel giriş formlarında zorunlu alanlar:
name,email - Diğer alanları dilediğiniz gibi genişletebilirsiniz. Her alanın bir adı olmalıdır, bu sayede ziyaretçi verileri uzaktan güncellenebilecektir.
Örnek bir özel giriş formu tasarlayalım ve şu alanları ekleyelim:
(name, email, phone, identityNumber)
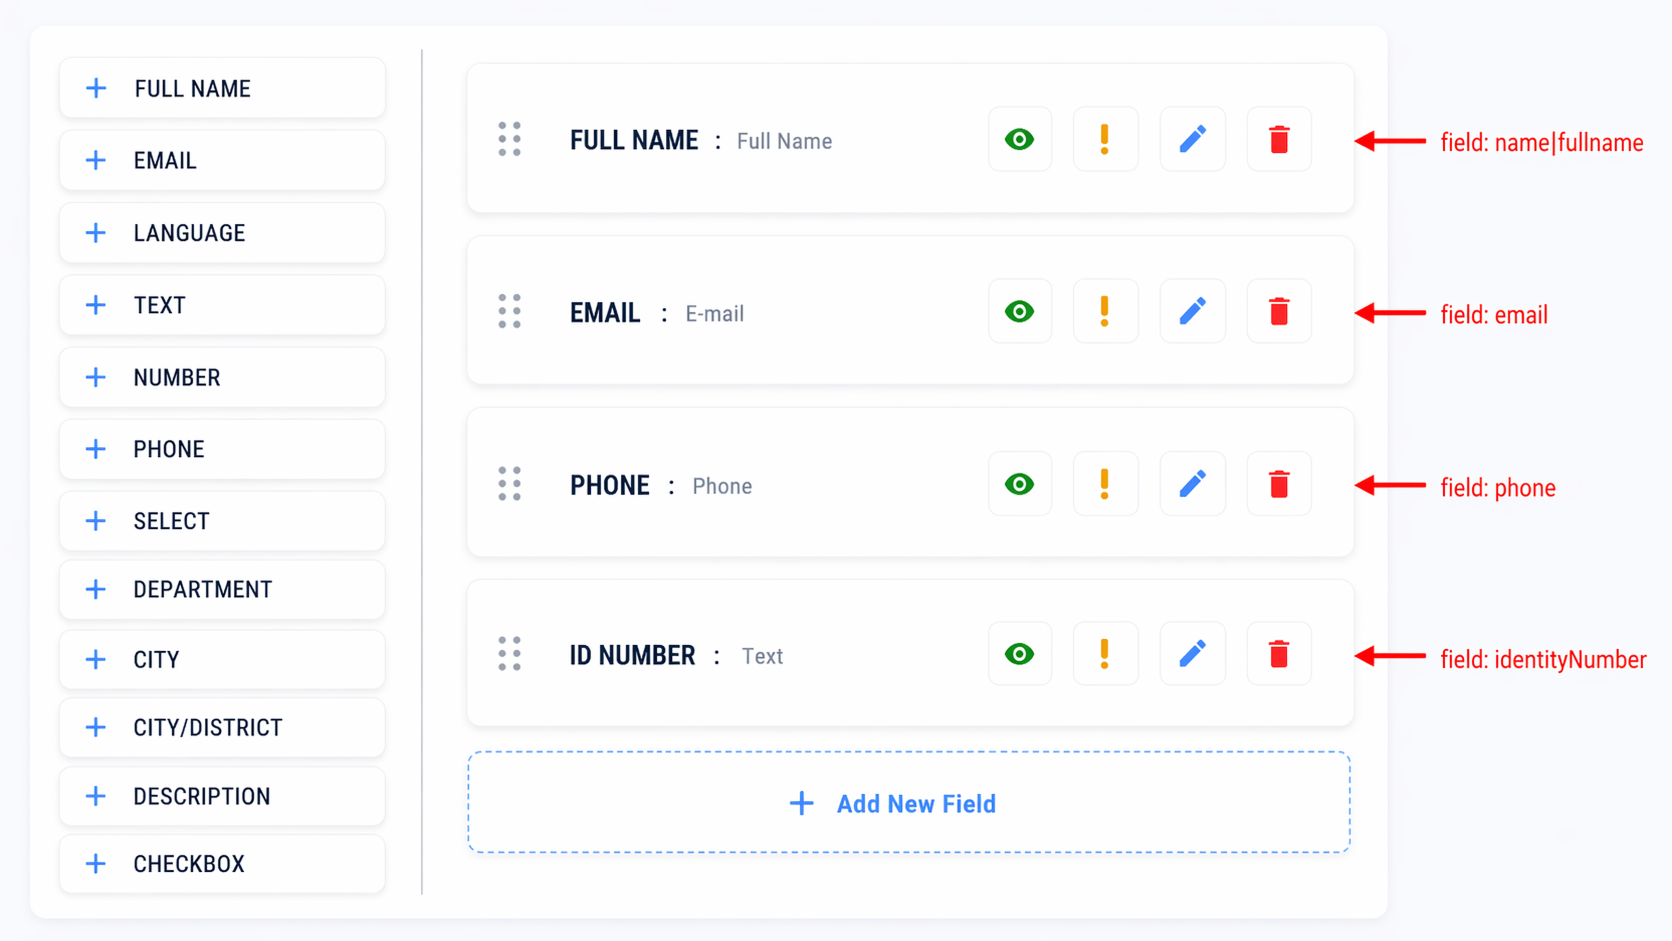
supsis("setUserData", {
    name: "John Doe",
    email: "jonh.doe@gmail.com",
    phone: "5396829048",
    identityNumber: "13451123445",
});
Yukarıdaki komutu çalıştırdığınızda, giriş formu önceden doldurulmuş olarak gelecektir.
Özel Kullanıcı Verilerini Güncelleme (User Contact Properties)
- Panel üzerinden oluşturulan özel kullanıcı verilerini güncelleyebilirsiniz.
- Örneğin, bir müşteri canlı desteğe bağlandığında ve onun hakkında daha detaylı bilgi almak istediğinizde bu özellik işinize yarayacaktır.
Örnek Adımlar
- Müşterinizin üyelik seviyesini bilmek isterseniz aşağıdaki adımı takip edin.
Öncelikle, User Rank adında bir etiket oluşturun ve alan değerini buna göre ayarlayın.
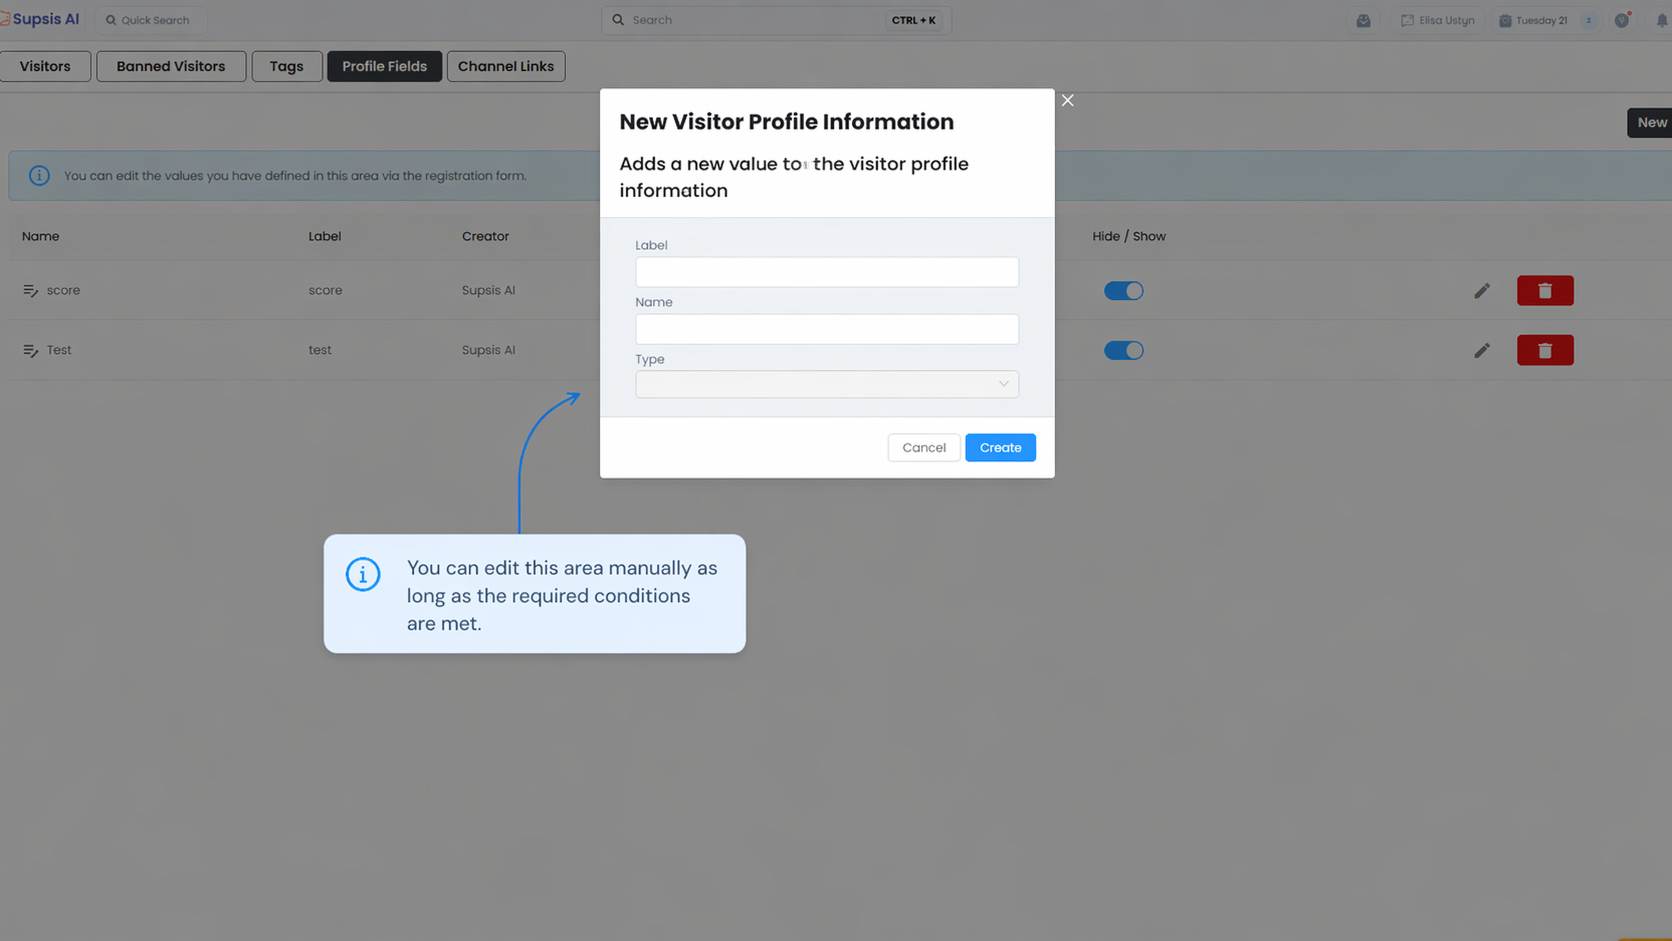
- Şimdi bu User Rank etiketini müşterimize atamak istiyoruz.
supsis("ready", (supsis) => {
    // Supsis hazır olduğunda olay (event) dinleniyor.
    // üye (member) verisi web sitenizden alınıyor.
    const member = {
        badget: "gold_member",
        ...
    };
    supsis.setContactProperty({ badget: member.badget });
});